Sourdough Pull-Apart Garlic Bread (With Cheese & Herbs)
-
Why Make Garlic Bread with Sourdough?
-
Ingredients You'll Need
- For the dough:
- For the filling:
-
Step-by-Step Instructions
- Mix the Dough
- Strengthen with Folds
- Make the Garlic Herb Butter
- Shape the Bread
- Final Proof
- Bake with Steam
-
Serving Tips
-
Why You'll Love This Recipe
-
You Might Also Like These Posts
-
Meta Title & Description
There’s something magical about tearing into a warm, golden loaf of sourdough pull apart garlic bread. Each piece is fluffy, buttery, loaded with garlic, herbs, and cheese, and pulls away like it was meant to be shared. Whether you're hosting a dinner party or just want to spoil yourself, this recipe is pure comfort, made even better with a naturally leavened, homemade dough.
This version uses sourdough starter, giving the bread a depth of flavor that commercial yeast simply can’t match. The inside stays soft and pillowy, while the outside turns perfectly golden thanks to an egg wash and a bit of oven steam. Let’s make this unforgettable cheesy garlic pull apart bread from scratch!
Why Make Garlic Bread with Sourdough?
If you’ve ever asked, “Can you make garlic bread with sourdough?” - absolutely yes. Not only is sourdough garlic bread more flavorful, but it also digests better thanks to the fermentation process. Studies like this one from Harvard Health suggest fermented foods may support gut health and improve nutrient absorption.
If you're working with discard, you might prefer our sourdough discard garlic bread variation, but for this version, we recommend using an active, bubbly starter to get the perfect rise and texture.
Ingredients You'll Need
This garlic cheese sourdough pull apart bread starts with a soft enriched dough, made extra tender with milk, egg, and butter. The flavor comes alive with a garlicky herb butter and generous handfuls of shredded cheese.
For the dough:
410 g all-purpose or bread flour
240 g lukewarm milk
1 tbsp honey (optional)
60 g soft unsalted butter
1 egg (plus 1 extra for egg wash)
1 tsp garlic powder (or to taste)
1 tsp fresh chopped rosemary (optional)
110 g active sourdough starter
For the filling:
100 g (or more!) cheddar, gouda, or your best cheese for garlic bread
~120 g soft butter
Fresh rosemary and parsley
Crushed garlic
Salt to taste
There are no strict rules here - that’s the beauty of this cheesy sourdough garlic bread. Use what you love, taste your filling, and don’t hold back on flavor.

Looks so good!
Step-by-Step Instructions
Mix the Dough
Make sure your sourdough starter isn’t too sour - feed it before peak, especially if you’re unsure about its strength.
Need help? Check our sourdough feeding guide, How to Feed Your Sourdough Starter for Perfect Baking Results.
Combine all ingredients except salt and butter. Once a rough dough forms, add the butter and salt, kneading until smooth and elastic - at least 5 minutes. You should get a soft, slightly sticky dough. If it’s too hard to handle, add a touch more flour.
Let it rest for 20 minutes.
Strengthen with Folds
Perform 4 coil folds (or stretch and folds if that’s easier for you) over the next 1–1.5 hours, allowing 20 minutes rest between each.
Want to learn more about folding techniques? Head over to Folding Dough: Why It Matters and How to Do It Right.
Meanwhile, prepare your filling.
Make the Garlic Herb Butter
Add soft butter, garlic, rosemary, parsley, and salt to a food processor. Blend until creamy and fragrant. Grate the cheese and set aside.
Pro tip: Even if you don’t use all the butter, the leftover garlic herb spread will stay fresh in the fridge.
Shape the Bread
Grease your loaf pan, preferably with butter. Divide the dough into 12 equal pieces (a scale helps, but isn’t necessary).

Gently flatten each piece - carefully not to press the air out - spread generously with garlic butter, sprinkle with cheese, fold in half, and stack sideways in the pan.
First, the Butter!

Then the cheese!

You’re building a sourdough pull apart roll loaf that’s as beautiful as it is tasty.

Final Proof
Cover with plastic wrap and proof until puffy. For mild flavor, proof in a warm spot for 3–4 hours. For deeper tang, refrigerate overnight.
Bake with Steam
Preheat your oven to 180°C (356°F) and place a tray or metal pan at the bottom. When ready to bake, brush the loaf with beaten egg. Pour ~100 ml of hot water into the tray to generate steam, and quickly close the oven door. Just like we did with the sourdough bread.
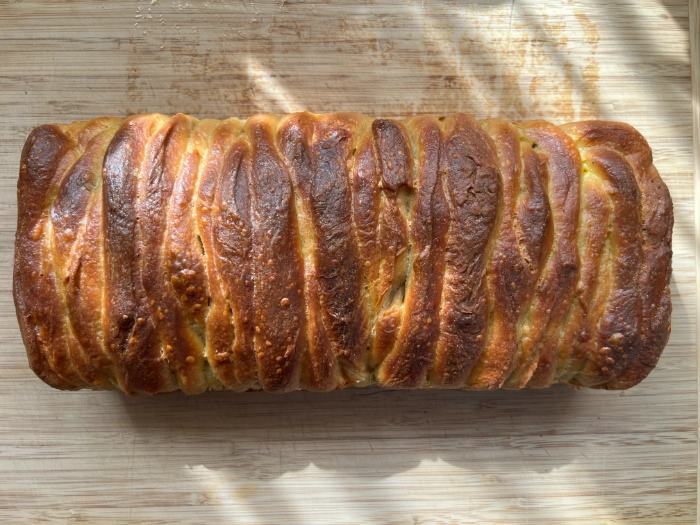
Bake for 20 minutes, then open the door slightly to release steam. Continue baking for another 20–25 minutes until deep golden brown.

Serving Tips
Serve warm, gooey, and straight from the pan. It’s fantastic with soups, pasta, or even as a standalone centerpiece.
Leftovers? Warm them up in the oven for 5–7 minutes - good as new. And if you're like us, you’ll be spreading that leftover garlic butter on everything the next day.
Why You'll Love This Recipe
Deep, rich flavor thanks to fermentation
Tear-and-share format perfect for gatherings
Fully customizable with different herbs and cheeses
Uses your sourdough starter in a fun, creative way
Can be proofed overnight for flexible timing
Looking for even more flavor? Try a rosemary variation or go bold with garlic parmesan. There are endless ways to riff on this sourdough garlic pull apart bread.
You Might Also Like These Posts
How to Feed Your Sourdough Starter for Perfect Baking Results
Folding Dough: Why It Matters and How to Do It Right
How to Make Homemade Sourdough Bread: A Beginner’s Guide
The Ultimate Guide to Sourdough Focaccia (Easy & Fluffy)
Meta Title & Description
Meta Title (60 characters):
Sourdough Pull Apart Garlic Bread: Cheesy & Fluffy Recipe
Meta Description (160 characters):
This sourdough pull apart garlic bread is cheesy, soft, and packed with flavor. A perfect tear-and-share loaf made with garlic butter and fresh herbs.
-
Why Make Garlic Bread with Sourdough?
-
Ingredients You'll Need
- For the dough:
- For the filling:
-
Step-by-Step Instructions
- Mix the Dough
- Strengthen with Folds
- Make the Garlic Herb Butter
- Shape the Bread
- Final Proof
- Bake with Steam
-
Serving Tips
-
Why You'll Love This Recipe
-
You Might Also Like These Posts
-
Meta Title & Description