
Crispy Oven-Baked Whole Chicken Legs
-
Oven-Baked Chicken Legs at a Glance
-
Why This Method Works
-
Equipment
-
Ingredients
- For the chicken
- Optional seasonings
-
How to Make Oven-Baked Whole Chicken Legs
- 1. Preheat the Oven
- 2. Season the Chicken
- 3. Add the Garlic
- 4. Add the Liquid
- 5. Cover and Roast
- 6. Remove the Foil and Crisp the Skin
- 7. Rest Before Serving
-
Optional Technique: Salt the Chicken Ahead
-
Pro Tips for Tender Chicken and Crispy Skin
- Keep the Skin Facing Up
- Do Not Baste the Chicken
- Let the Broiler Do the Final Work
- Watch the Chicken Constantly Under the Broiler
- Save the Pan Juices
-
Don’t Waste the Garlic: Make This Quick Yogurt Sauce
- Quick roasted garlic yogurt sauce
-
What to Serve With Baked Chicken Legs
- Creamy Mashed Potatoes
- Rice
- Pan-Fried Broccoli
- Quinoa or Bulgur
- Roasted Vegetables or a Simple Salad
- Finish With Lemon
-
Easy Seasoning Variations
- Classic
- Herb Chicken
- Lemon and Herb
- Your Favorite Seasoning Blend
-
Can I Make This With Chicken Thighs?
-
Troubleshooting
- My chicken skin is not crispy
- The chicken is browning too quickly
- The chicken is cooked but still feels firm
- The roasting dish is becoming completely dry
- There is a lot of liquid left in the dish
-
Storage and Reheating
-
FAQ
- How long do whole chicken legs take to cook in the oven?
- What temperature should I bake whole chicken legs at?
- What internal temperature should chicken legs reach?
- Should chicken legs be covered while baking?
- How do you make baked chicken skin crispy?
- Do I need to baste chicken legs while they cook?
- Can I use chicken thighs instead of whole chicken legs?
- Can I use white wine instead of water?
- Do I have to dry brine the chicken?
-
Final Thoughts
-
You Might Also Like
- Creamy Mashed Potatoes
- How to Cook Rice
- Sous Vide Chicken Thighs
- Creamy Mushroom Chicken
There is something hard to beat about a classic roasted chicken leg.
It reminds me of the kind of Sunday lunch you would get at your grandmother’s house: deeply savory, comforting, and completely uncomplicated. You do not need a complicated marinade or a long ingredient list to make chicken taste good. Salt, black pepper, garlic, and the right cooking method already get you most of the way there.
This recipe uses whole chicken legs - the thigh and drumstick still connected - and cooks them gently under foil until the meat is extremely tender. Then remove the foil and broil until the skin turns golden and as crisp as you like.
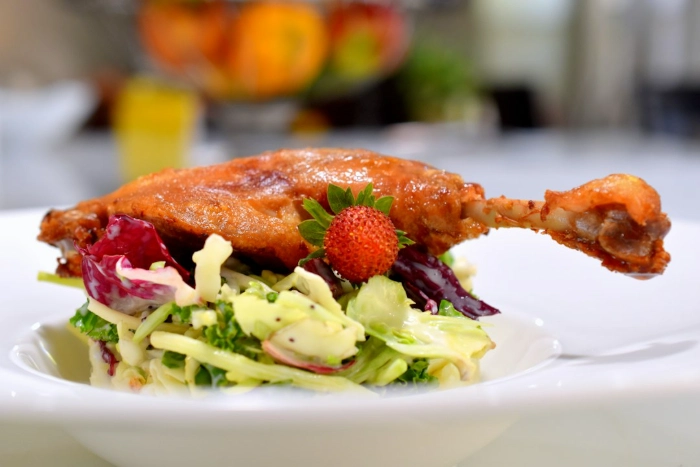
The result is exactly what I want from baked chicken legs: meat that is almost falling from the bone but still has a little structure, with rich chicken flavor and crisp skin on top.
And because most of the cooking happens covered, you don't need to stand next to the oven basting the chicken every 15 minutes.
Oven-Baked Chicken Legs at a Glance
For this method, bake whole chicken legs covered at 170°C / 340°F for around 1½ hours, or until the thick thigh section is very tender.
Then remove the foil and finish the chicken under the broiler/grill until the skin is golden and crispy.
Let the chicken rest for about 10 minutes before serving. Total time is usually just under 2 hours, but very little of that is active work.
Why This Method Works
Instead of roasting the chicken at high heat from the start, I prefer to split the cooking into two stages.
First, the chicken cooks gently under foil. The covered environment keeps moisture around the meat while the thigh slowly becomes tender.
Then the priorities change. Once the chicken is cooked and tender, we no longer need the foil. At that point, we want the opposite environment: dry, intense heat.
Removing the foil and finishing the chicken under the broiler quickly browns and crisps the skin without exposing the meat to aggressive heat throughout the entire cooking process.
It is a very forgiving method, which is one reason I like it so much.
Equipment
You do not need anything special for this recipe.
A medium roasting dish or high-sided baking dish
Aluminum foil
Tongs
Optional but recommended: instant-read meat thermometer
Choose a roasting dish that holds the chicken comfortably without stacking the pieces on top of one another.
Ingredients
This recipe makes 2 whole chicken legs.
For planning larger portions, I generally count approximately one whole chicken leg per adult, depending on their size and what you serve alongside them.
For the chicken
2 whole bone-in, skin-on chicken legs
6 garlic cloves
100 ml / scant ½ cup water or dry white wine
Salt, to taste
Freshly ground black pepper, to taste
Optional seasonings
Dried or fresh thyme
Marjoram
A small pinch of freshly grated nutmeg
Salt and pepper are enough for a really good chicken leg. Use the herbs when you want a little extra flavor, not because the recipe depends on them.
One combination I particularly like is thyme, marjoram, and just a little nutmeg. It adds aroma without turning a simple roast chicken into something heavily seasoned.
How to Make Oven-Baked Whole Chicken Legs
1. Preheat the Oven
Preheat your oven to 170°C / 340°F, using conventional top-and-bottom heat if available.
2. Season the Chicken
Season the chicken legs generously with salt and freshly ground black pepper.
If you are using thyme, marjoram, nutmeg, or another seasoning blend, add it now.
Keep the skin facing upward. You can also season the chicken ahead of time - I explain why that can improve the result in the optional technique section below - but it is absolutely not required.
3. Add the Garlic
Lightly crush the garlic cloves with the palm of your hand or the flat side of a knife and remove the peel.
Place them around the chicken. Do not mince them. Keeping the cloves whole allows them to slowly soften in the chicken fat and juices without burning.
By the end, they become incredibly soft, sweet, and savory.
4. Add the Liquid
Pour 100 ml / scant ½ cup of water into the bottom of the roasting dish.
If you already have a bottle of dry white wine open, I recommend you use that instead. Try to pour the liquid around the chicken rather than over the skin.
The wine is optional. I mainly like it because its acidity and aroma balance the richness of chicken legs particularly well.
Most of the tenderness in this recipe comes from the long, covered cooking process rather than the wine, so plain water still gives an excellent result.
5. Cover and Roast
Cover the roasting dish tightly with aluminum foil and bake at 170°C / 340°F for approximately 1½ hours.
I usually start checking the chicken a little before then. You are looking for the thick thigh section to become very tender. When you move the leg, the meat should feel soft and should begin loosening around the bone, but ideally it should not completely fall apart.
For food safety, poultry should reach a minimum internal temperature of 74°C / 165°F when measured in the thickest part of the meat without touching the bone.
With this recipe, however, I continue cooking beyond the safe minimum because I want a much softer texture in the dark meat.
6. Remove the Foil and Crisp the Skin
Once the chicken is tender, remove the foil. Switch your oven to its broiler/grill setting. Place the chicken back into the oven and watch it closely.
Depending on your oven, the skin may need only a few minutes or considerably longer to become golden and crispy. This is the one stage of the recipe where I would not walk away from the kitchen.
Broilers vary enormously in strength, and beautifully browned chicken skin can turn burnt surprisingly quickly. Cook until the skin reaches the level of crispness you prefer.
7. Rest Before Serving
Remove the chicken from the oven and let it rest for about 10 minutes.
Then serve.
Do not automatically throw away what is left in the roasting dish.
You may not have much liquid remaining by this point. Instead, you will often find a concentrated mixture of chicken juices, rendered fat, gelatin-rich juices, and roasted garlic.
Spoon a little over mashed potatoes, and you will understand why I never waste it.
Optional Technique: Salt the Chicken Ahead
This isn't required for the recipe, but it is something I regularly do when I have time.
Season the chicken with salt at least 30 minutes before cooking, then leave it uncovered in the refrigerator.
If you are planning further ahead, you can leave it for several hours or even overnight.
At first, salt draws some moisture toward the surface of the meat. Given enough time, the dissolved salt gradually moves deeper into the chicken and changes how the muscle proteins interact with water.
The practical result is more even seasoning and potentially better moisture retention during cooking.
There is another useful effect here too. Leaving the chicken uncovered in the refrigerator lets the skin's surface dry slightly. Less surface moisture makes it easier to brown and crisp the skin later.
If you salt the chicken ahead of time, remember that it is already seasoned - do not salt it heavily again immediately before baking.
This is essentially the same technique commonly called dry brining.
Pro Tips for Tender Chicken and Crispy Skin
Keep the Skin Facing Up
Keep the skin above the liquid throughout cooking.
We want the chicken to benefit from the moist, covered environment without effectively boiling the skin.
Do Not Baste the Chicken
You do not need to repeatedly spoon the juices over the meat.
During the covered stage, the chicken already has enough moisture around it.
Once you remove the foil, repeatedly wetting the skin actually works against what we are trying to achieve.
At that point, dry skin is good skin.
Let the Broiler Do the Final Work
Do not worry if the skin looks soft and fairly pale when you first remove the foil.
That is normal. The covered stage is for tenderness. The broiler stage is for crispness.
Trying to achieve both things at the same time is unnecessary.
Watch the Chicken Constantly Under the Broiler
I cannot overstate this one.
Some broilers are relatively gentle. Others are basically small flamethrowers mounted above your dinner.
The final browning can happen extremely quickly. Stay nearby.
Save the Pan Juices
What remains underneath the chicken can be one of the best parts of the dish.
If you are serving mashed potatoes, rice, bulgur, or another relatively neutral side, spoon a little of the concentrated chicken juices over the top.
It carries an enormous amount of flavor.
Don’t Waste the Garlic: Make This Quick Yogurt Sauce
The whole garlic cloves that cook underneath the chicken deserve more attention than they usually get.
After the long roast, they become incredibly soft and absorb some of the chicken fat and juices surrounding them. It practically confits.
Recently, I started turning them into a simple yogurt/crème fraîche sauce, and it works surprisingly well.
If you know you want to make the sauce, use 8 garlic cloves instead of six, or even a bit more.
Quick roasted garlic yogurt sauce
Mash the soft roasted garlic into a smooth paste.
Mix with:
2–3 tbsp plain yogurt or crème fraîche
Salt, to taste
Freshly ground black pepper
A little onion powder
Chopped fresh chives
A small squeeze of fresh lemon juice
Optional additions for extra umami flavor:
A small pinch of dried mushroom powder
A small pinch of dried tomato powder
The yogurt amount is deliberately flexible. Use less for a more intense roasted-garlic sauce, or add more yogurt if you prefer something lighter.
Taste it after mixing and adjust the salt, lemon, or seasoning as needed.
The roasted garlic gives the sauce a deep, savory flavor, while the yogurt and lemon keep it from becoming heavy.
I especially like it alongside the chicken, but it is also excellent with rice, potatoes, salads, roasted vegetables, or inside a tortilla or wrap with leftover chicken.
What to Serve With Baked Chicken Legs
One of the best things about simple roast chicken is how easily it works with different sides.
Creamy Mashed Potatoes
This is probably my favorite pairing.
The potatoes catch the concentrated chicken juices from the bottom of the roasting dish, and the creamy texture works beautifully with the crispy skin.
For something simpler, serve the chicken with fluffy rice.
Rice absorbs the pan juices extremely well without competing with the chicken.
Pan-Fried Broccoli
If you want something lighter, quickly pan-fried or roasted broccoli works very well.
You still get the rich chicken, but the plate feels considerably fresher. This pairs extremely well with the yogurt sauce.
Quinoa or Bulgur
Both work when you want a grain with a little more texture.
The roasted garlic yogurt sauce works well with these because it adds moisture and acidity.
Roasted Vegetables or a Simple Salad
Carrots, zucchini, peppers, cauliflower, or whatever vegetables you already have can all work.
A simple, acidic salad also helps cut through the richness of the chicken.
Finish With Lemon
A tiny squeeze of fresh lemon over the chicken immediately before serving can make a surprisingly big difference.
You do not want to turn the dish into lemon chicken. You are just adding enough acidity to cut through some of the richness from the dark meat and rendered fat.
I prefer doing this at the table rather than soaking the skin in lemon juice before broiling, because I want the skin as dry and crispy as possible.
Easy Seasoning Variations
The cooking method stays the same even if you change the seasoning.
Classic
Salt + black pepper.
Honestly, that is enough.
Herb Chicken
Add thyme and marjoram with a tiny amount of nutmeg. This is probably my favorite variation when I want more flavor while keeping the chicken light and familiar.
Lemon and Herb
Add thyme to the chicken and serve with fresh lemon at the end.
You can also place a couple of lemon slices under the chicken in the roasting dish, although I still prefer the fresher acidity you get from adding lemon immediately before serving.
Your Favorite Seasoning Blend
Use whatever blend you already enjoy with chicken. The exact seasoning isn't the important thing.
The covered roast, followed by a hot finish, defines the texture of this recipe.
I would keep the whole garlic cloves in every version.
Can I Make This With Chicken Thighs?
Yes.
This exact method also works well with bone-in, skin-on chicken thighs. A whole chicken leg contains both the thigh and drumstick, and the thigh is the thickest section of the whole piece.
That means the basic cooking logic stays essentially the same. If your individual thighs are significantly smaller than the whole legs used here, begin checking them earlier rather than blindly following the full cooking time.
Always judge the chicken by both temperature and texture.
Troubleshooting
My chicken skin is not crispy
Give it more time under the broiler. Also make sure the skin is facing upward and is not sitting underneath liquid.
If you dry-brined the chicken uncovered beforehand, that can make crisping even easier and better.
The chicken is browning too quickly
Your broiler is probably stronger than mine.
Move the baking dish farther away from the heating element or reduce the broiler intensity if your oven allows it.
The chicken is cooked but still feels firm
Cover it again and continue roasting.
The minimum safe temperature tells you the chicken is safe to eat, but it doesn't automatically give you the soft texture we are looking for in this recipe.
The roasting dish is becoming completely dry
Add a small splash of water.
You do not need the chicken swimming in liquid. We only want enough moisture in the covered dish to support the gentle cooking environment.
There is a lot of liquid left in the dish
That is not necessarily a problem.
Chicken size, roasting dishes, ovens, and how tightly the foil seals can all change how much moisture evaporates.
If you want a more concentrated jus, remove the chicken and reduce the liquid separately for a few minutes.
Storage and Reheating
Allow leftovers to cool and refrigerate them promptly in an airtight container.
You can store cooked chicken in the refrigerator for 3–4 days.
For longer storage, freeze the cooked chicken in an airtight container or freezer-safe bag. For best quality, use cooked chicken within about 4 months.
When reheating, I prefer the oven over the microwave if you want the skin to stay crisp. The microwave works perfectly well when convenience matters more, but the skin will soften and be a bit soggy.
FAQ
How long do whole chicken legs take to cook in the oven?
With this method, cook whole chicken legs covered at 170°C / 340°F for about 1½ hours, then finish under the broiler to crisp the skin. Including preparation, browning, and resting, expect the entire process to take just under 2 hours.
Chicken size and ovens vary, so use the cooking time as a guide rather than an absolute rule.
What temperature should I bake whole chicken legs at?
For this recipe, I use 170°C / 340°F.
The lower temperature and covered roasting dish are deliberate. The goal is to gently tenderize the dark meat before using intense heat only at the end to crisp it.
What internal temperature should chicken legs reach?
The USDA recommends cooking poultry to a safe minimum internal temperature of 74°C / 165°F, measured in the thickest part without touching the bone.
For this recipe, reaching the minimum safe temperature is not necessarily the end of cooking.
I continue until the thigh meat becomes very tender because that is the texture I want from whole chicken legs.
Should chicken legs be covered while baking?
They do not always have to be, but this recipe intentionally covers them for the first stage. The foil helps create the gentle cooking environment that gives us very tender meat.
Remove it at the end so we can crisp the skin.
How do you make baked chicken skin crispy?
Keep the skin facing upward, avoid repeatedly wetting it, and finish the chicken with strong dry heat.
Drying the skin beforehand - including by leaving salted chicken uncovered in the refrigerator - also helps.
The broiler is what gives this recipe its final golden, crispy skin.
Do I need to baste chicken legs while they cook?
No.
You don't need to baste these chicken legs during cooking. The covered roasting stage keeps the chicken moist, while leaving the skin alone during the final stage helps it crisp.
Can I use chicken thighs instead of whole chicken legs?
Yes.
Bone-in, skin-on thighs work with essentially the same technique.
Because individual thighs may be smaller than whole legs, start checking them earlier.
Can I use white wine instead of water?
Absolutely.
I like using dry white wine when I already have a bottle open. Its acidity and aroma help balance the richness of the chicken, but water still gives an excellent result.
Do I have to dry brine the chicken?
No.
It is an optional improvement, not a requirement. If you have at least 30 minutes, salting the chicken ahead can improve seasoning and help dry the skin. If dinner needs to go into the oven immediately, simply season the chicken and continue with the recipe.
Final Thoughts
This is the kind of recipe I think everyone should know. No difficult techniques or expensive ingredients.
Salt, pepper, garlic, a little liquid, and enough time in the oven can turn a couple of inexpensive chicken legs into genuinely great comfort food.
The covered roasting makes the recipe forgiving. The broiler gives you control over exactly how crispy you want the skin. And the garlic and concentrated juices left in the pan mean even the simplest side dish suddenly has something worth spooning over it.
Make it simply the first time.
Then start playing with the herbs, wine, lemon, dry brining, or the roasted garlic yogurt sauce once you understand the basic method.
That is usually how the best everyday recipes become your own.
You Might Also Like
Creamy Mashed Potatoes
Silky, buttery mashed potatoes are probably my favorite side for these chicken legs. They give all of those concentrated roasting juices somewhere very useful to go.
How to Cook Rice
If you want a simpler side, properly cooked fluffy rice absorbs chicken juices beautifully while keeping the meal easy and versatile.
Sous Vide Chicken Thighs
Want to see what happens when you take the same flavorful dark meat in a completely different technical direction? Sous vide gives you precise control over tenderness before a final hard sear.
Creamy Mushroom Chicken
For a richer chicken dinner, this creamy mushroom version combines juicy chicken with a savory sauce that is perfect over potatoes or rice.
-
Oven-Baked Chicken Legs at a Glance
-
Why This Method Works
-
Equipment
-
Ingredients
- For the chicken
- Optional seasonings
-
How to Make Oven-Baked Whole Chicken Legs
- 1. Preheat the Oven
- 2. Season the Chicken
- 3. Add the Garlic
- 4. Add the Liquid
- 5. Cover and Roast
- 6. Remove the Foil and Crisp the Skin
- 7. Rest Before Serving
-
Optional Technique: Salt the Chicken Ahead
-
Pro Tips for Tender Chicken and Crispy Skin
- Keep the Skin Facing Up
- Do Not Baste the Chicken
- Let the Broiler Do the Final Work
- Watch the Chicken Constantly Under the Broiler
- Save the Pan Juices
-
Don’t Waste the Garlic: Make This Quick Yogurt Sauce
- Quick roasted garlic yogurt sauce
-
What to Serve With Baked Chicken Legs
- Creamy Mashed Potatoes
- Rice
- Pan-Fried Broccoli
- Quinoa or Bulgur
- Roasted Vegetables or a Simple Salad
- Finish With Lemon
-
Easy Seasoning Variations
- Classic
- Herb Chicken
- Lemon and Herb
- Your Favorite Seasoning Blend
-
Can I Make This With Chicken Thighs?
-
Troubleshooting
- My chicken skin is not crispy
- The chicken is browning too quickly
- The chicken is cooked but still feels firm
- The roasting dish is becoming completely dry
- There is a lot of liquid left in the dish
-
Storage and Reheating
-
FAQ
- How long do whole chicken legs take to cook in the oven?
- What temperature should I bake whole chicken legs at?
- What internal temperature should chicken legs reach?
- Should chicken legs be covered while baking?
- How do you make baked chicken skin crispy?
- Do I need to baste chicken legs while they cook?
- Can I use chicken thighs instead of whole chicken legs?
- Can I use white wine instead of water?
- Do I have to dry brine the chicken?
-
Final Thoughts
-
You Might Also Like
- Creamy Mashed Potatoes
- How to Cook Rice
- Sous Vide Chicken Thighs
- Creamy Mushroom Chicken